CREATING A PASSWORD
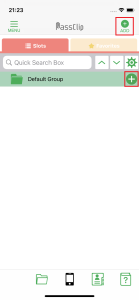
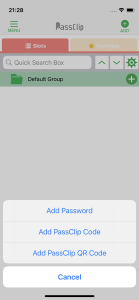
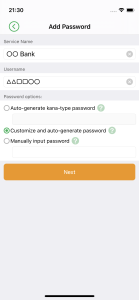
Tap the “+” button in the top right corner and select the “Add Password” option. To register a Slot directly to a particular Group, use the “+” button on the right side of the Group’s colored bar.
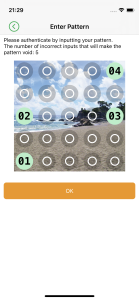
2.ENTER YOUR PATTERN
3.ADD PASSWORD
・Service Name
Enter the name of the service that the password is being used for. Using the official name can be helpful in terms of searching for the Slot.
・Username
Enter the username (Login ID) for the account.
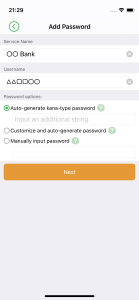
・How To Create a Password
| 【Method 1】Auto-generate kana-type password
The first 8 lower-case alphabetic characters of the password are represented by 4 Hiragana.
Additional alphabetic characters or characters of different character types can be added from the 9th character onwards.
<How to Use>
Auto-generating a password with 4 Hiragana
Tap “Next” button to automatically generate the Hiragana password.
Auto-generating a password with 4 Hiragana and additional characters
Enter the additional characters into the “Input an additional string” field and tap “Next” button to automatically generate a Hiragana password with the additional characters included at the end.
Why add the additional characters? → Additional characters can be used to strengthen the password and to meet the particular password requirements of the service or application that the password will be used for. The following character sets can be used for the additional characters: lower and uppercase alphabetic characters, numbers, and symbols (-@.!_).The additional string of characters entered into the “Input an additional string” field will be saved to the field and can be used for the next generation of kana-type password.
<How to read a Hiragana Password>
The password will consist of the 8 lowercase alphabetic characters represented by the 4 Hiragana displayed in the sequence of cells that correspond to your pattern. If additional characters are used, they will be appended to the lowercase alphabetic characters. |
| 【Method 2】Customize and auto-generate password
A password will be generated from the character sets that have been selected. The length of the password can also be specified.
 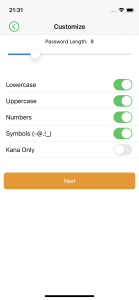 
<How to Use>
Specify the password length and the characters sets to be used for generating the password.
□ Length(4 – 24 characters)
□ Lowercase
□ Uppercase
□ Numbers
□ Symbols( – @ . ! _ )
□ Kana Only *If you select this option only lowercase alphabetic that conform to Hiragana will used for the password.
<How to read a Hiragana Password>
The password will consist of the 8 lowercase alphabetic characters represented by the 4 Hiragana displayed in the sequence of cells that correspond to your pattern. If additional characters are used, they will be appended to the lowercase alphabetic characters. |
| 【Method3】Manually input password
This option can be used for adding a password that you have created yourself or are already using.
<How to Use>
Manually input a password of 4 or more characters. |
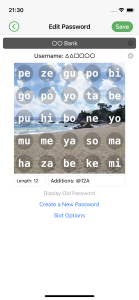
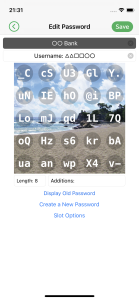
EDITING A PASSWORD
A password that has been added to PassClip can be edited.
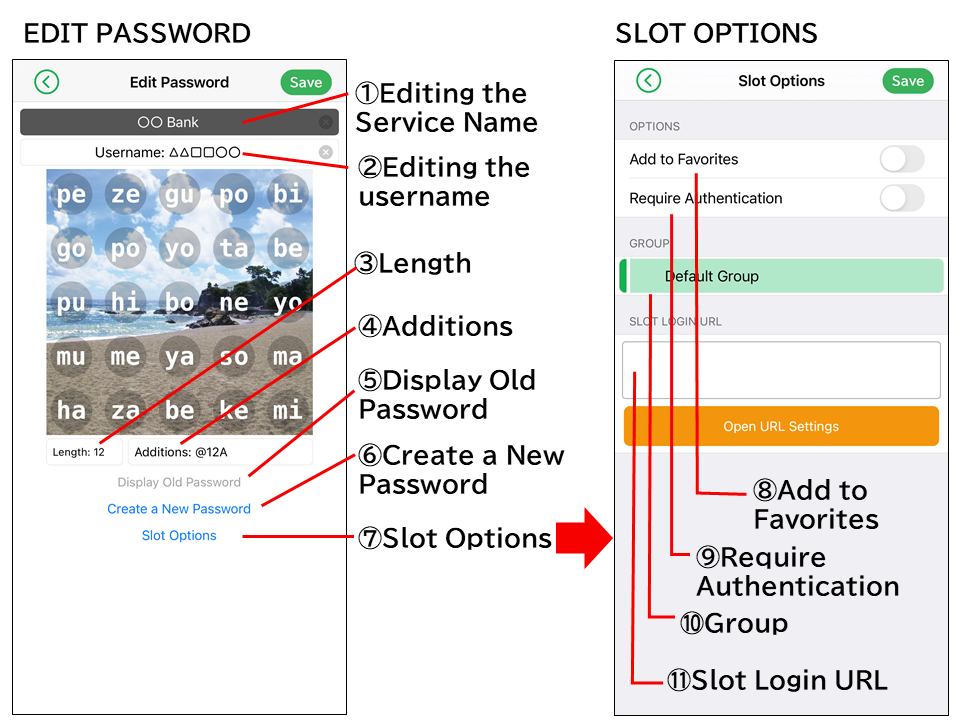
① Editing the Service Name
To edit the Service Name, tap the Service Name field.
② Editing the username
To edit the username, tap the username field.
③ Length
The number of characters in the password is displayed in this field
④ Additions
Any additional characters that have been used for the password will be displayed in this field. To edit this string of additional characters tap the field.
⑤ Display Old Password
By selecting this option you can view the previous password.
⑥ Create a New Password
Tap this option to create a new password for the Slot.
⑦ Slot Options
Tap this option to move to the “Slot Options” screen.
⑧ Save to Favorites
To add the Slot to the Favorites, toggle this option on (green).
⑨ Require Authentication
To require authentication for opening and viewing the Slot, toggle this option on (green).
⑩ Group
To select a Group to assign the Slot to, tap this option.
⑪ Slot Login URL
A URL for the Web service that the Slot is used for can be saved here and then accessed from inside the Slot with a single tap.
To save the options that have been selected for the Slot, tap the “Save” button in the upper right corner. By default, the Slot will be added to the “Default Group”. The Slot can then be assigned to a different Group.